> ## Documentation Index
> Fetch the complete documentation index at: https://docs.bitstudio.ai/llms.txt
> Use this file to discover all available pages before exploring further.
# Turn a photo into a video
> Animate an approved fashion image with a clear motion brief, then review the whole clip.
Start with a photo you already like. A finished image gives the video a concrete person, outfit, and setting to work from.
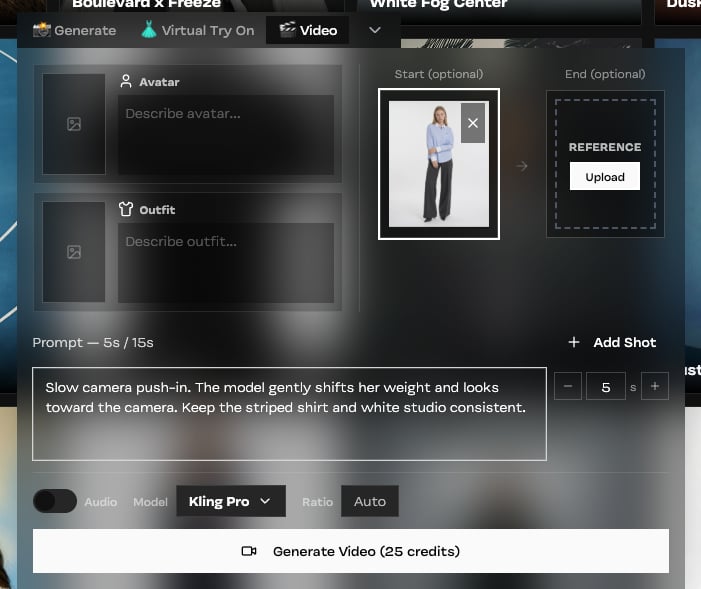
Open **Studio → Video**. Upload the image in **Start (optional)**. For a product clip, use a sharp image with the whole garment visible and some room around the person.
Give the subject one action and the camera one movement. Keep the first test short.
```text theme={null}
Slow camera push-in. The model gently shifts her weight and looks
toward the camera. Keep the striped shirt and white studio consistent.
```
Set the shot duration, model, and ratio using the options available to your account. Check **Audio** if you need generated sound. Review the credit total on **Generate Video**, then submit.
Watch the beginning, middle, and end. Check the face, hands, garment shape, print, and background for changes before downloading your chosen version.
 ## Add an end frame or more shots
An **End** image gives the clip a destination. Use a compatible person, outfit, and composition so the transition is plausible. You need a start frame before adding an end frame.
Use **Add Shot** when you need distinct beats. Give each shot a clear action and duration within the total shown in the panel. Begin with one shot while you establish the look; more shots add more decisions to review.
## Start from text
You can leave the start frame empty and describe the scene. This is useful for exploring a concept. For a specific product, an approved start photo is usually a clearer reference than a description alone.
If fabric or facial details drift, reduce the amount of motion and try a steadier camera. Fix problems in the source photo with the [Editor](/features/editor) before animating it.
## Add an end frame or more shots
An **End** image gives the clip a destination. Use a compatible person, outfit, and composition so the transition is plausible. You need a start frame before adding an end frame.
Use **Add Shot** when you need distinct beats. Give each shot a clear action and duration within the total shown in the panel. Begin with one shot while you establish the look; more shots add more decisions to review.
## Start from text
You can leave the start frame empty and describe the scene. This is useful for exploring a concept. For a specific product, an approved start photo is usually a clearer reference than a description alone.
If fabric or facial details drift, reduce the amount of motion and try a steadier camera. Fix problems in the source photo with the [Editor](/features/editor) before animating it.