Build a reusable person from a description or source photos, review four reference views, and use the avatar in a product series.
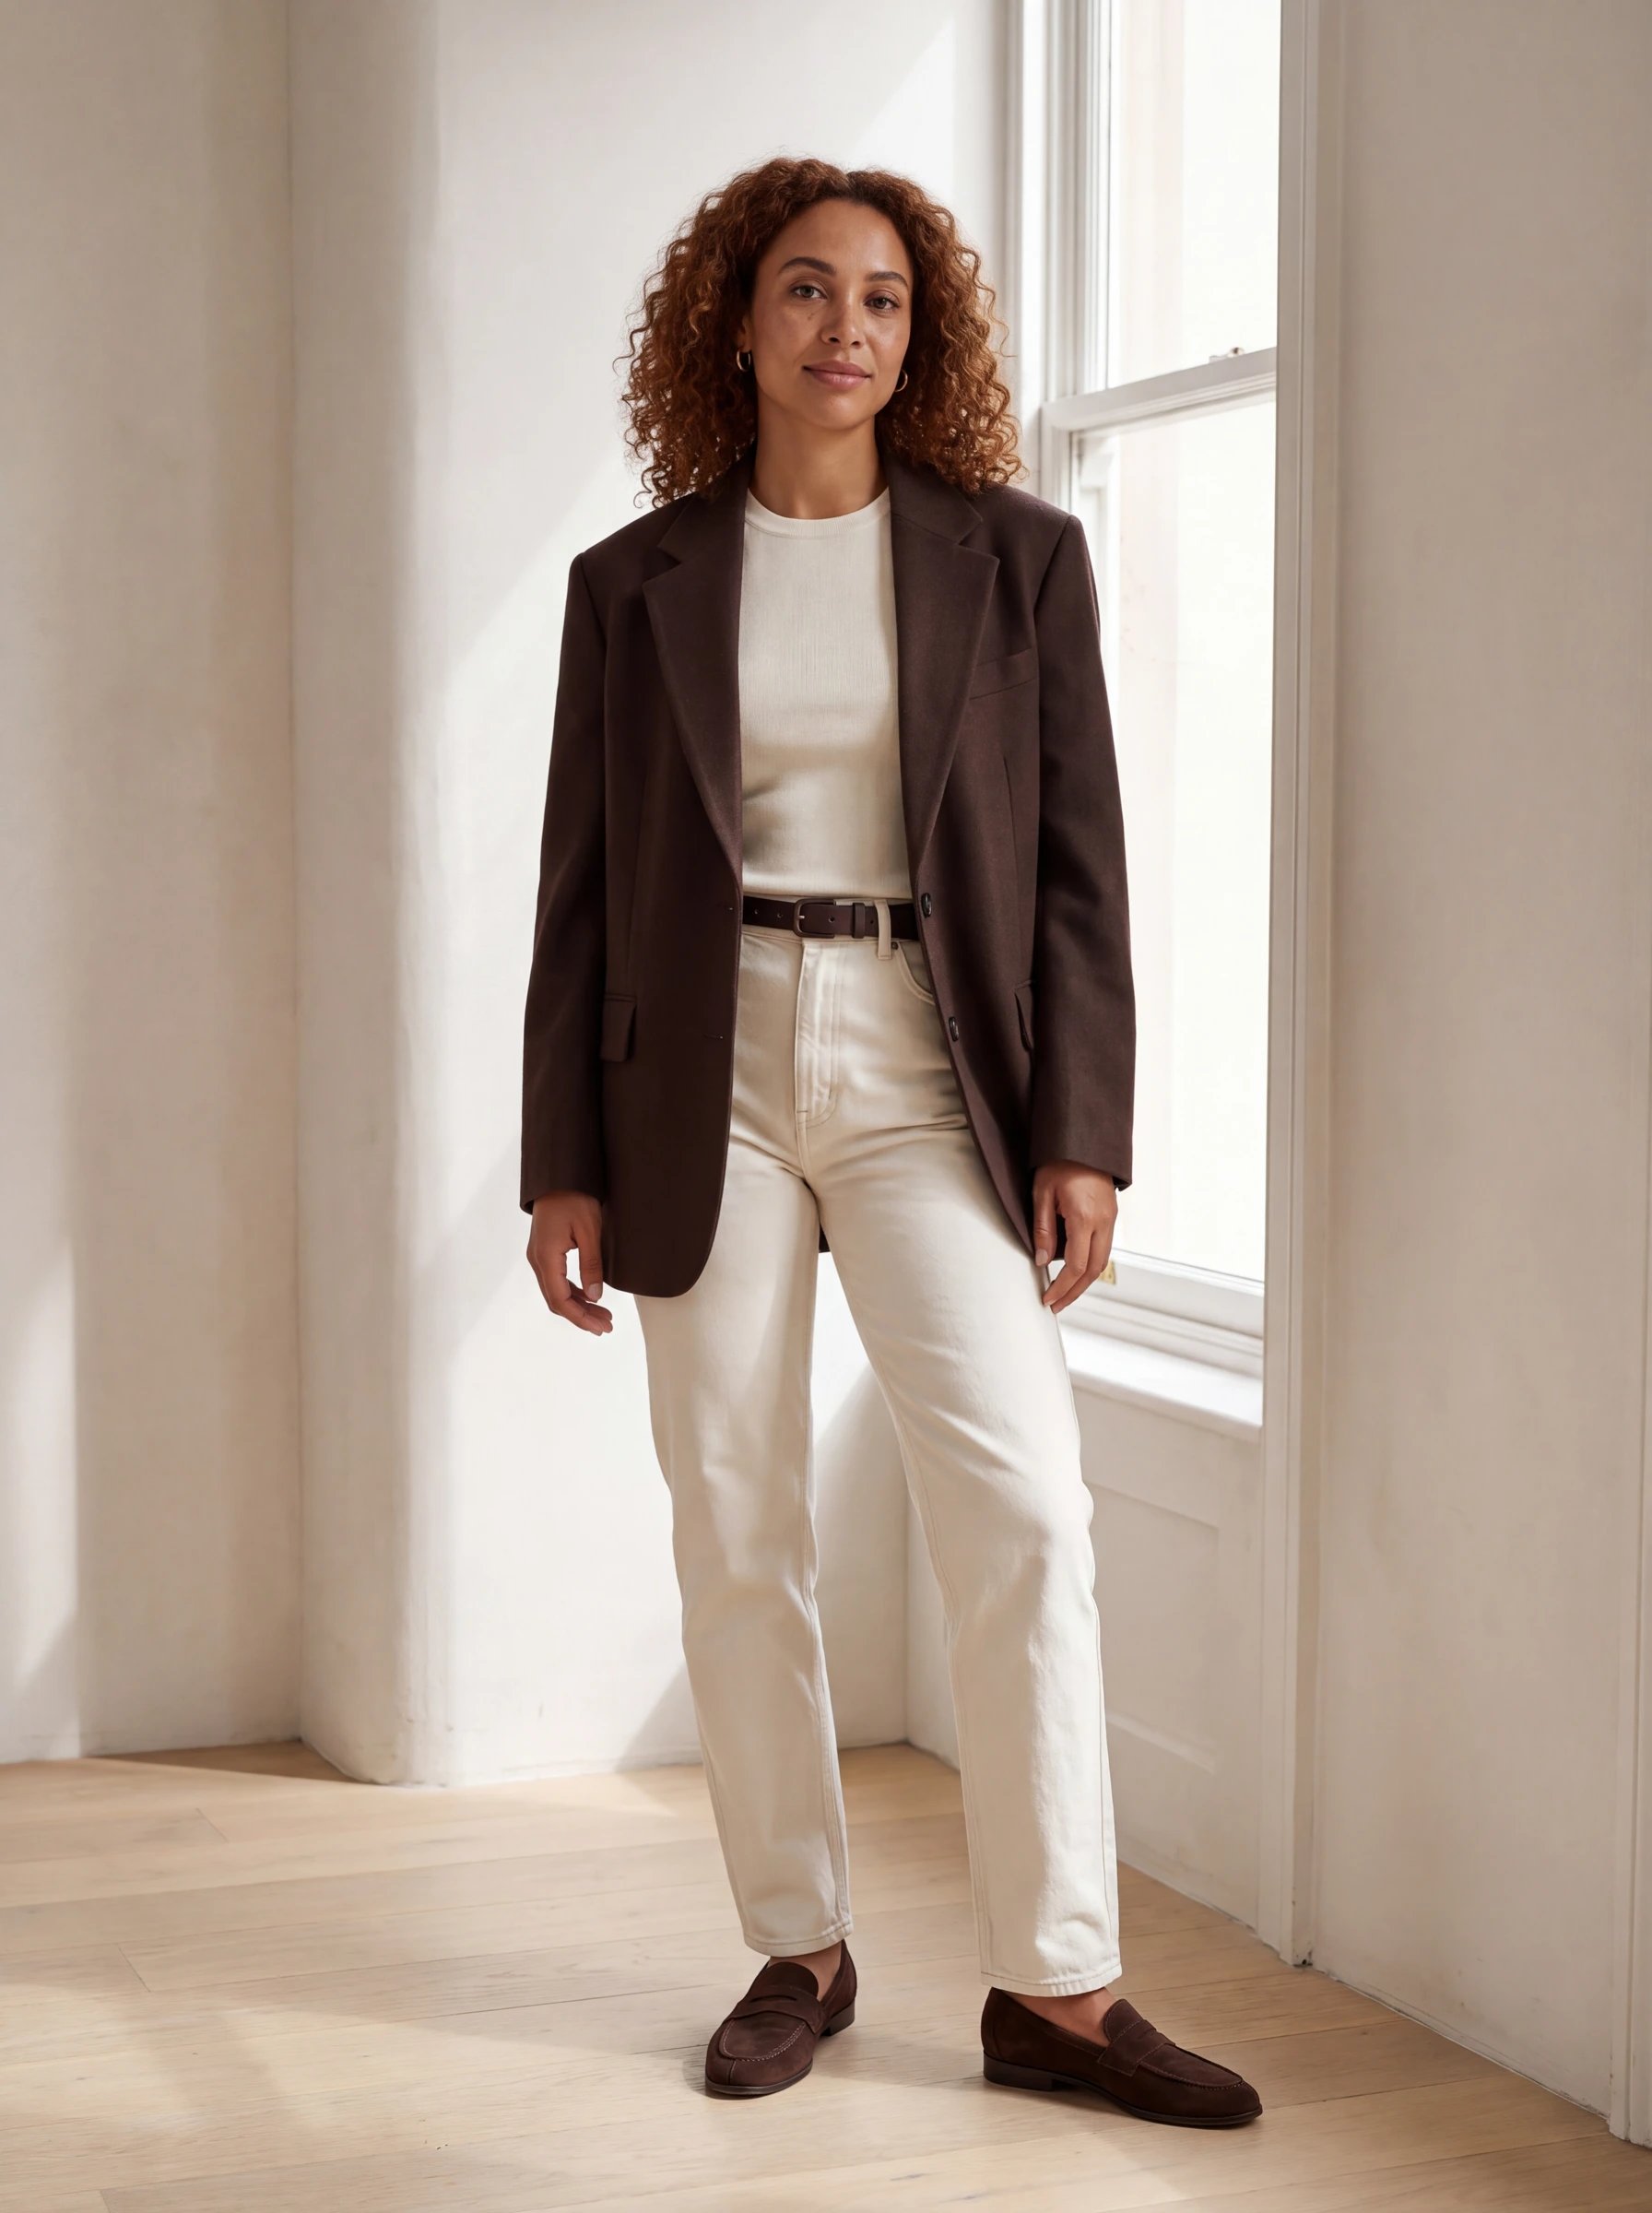
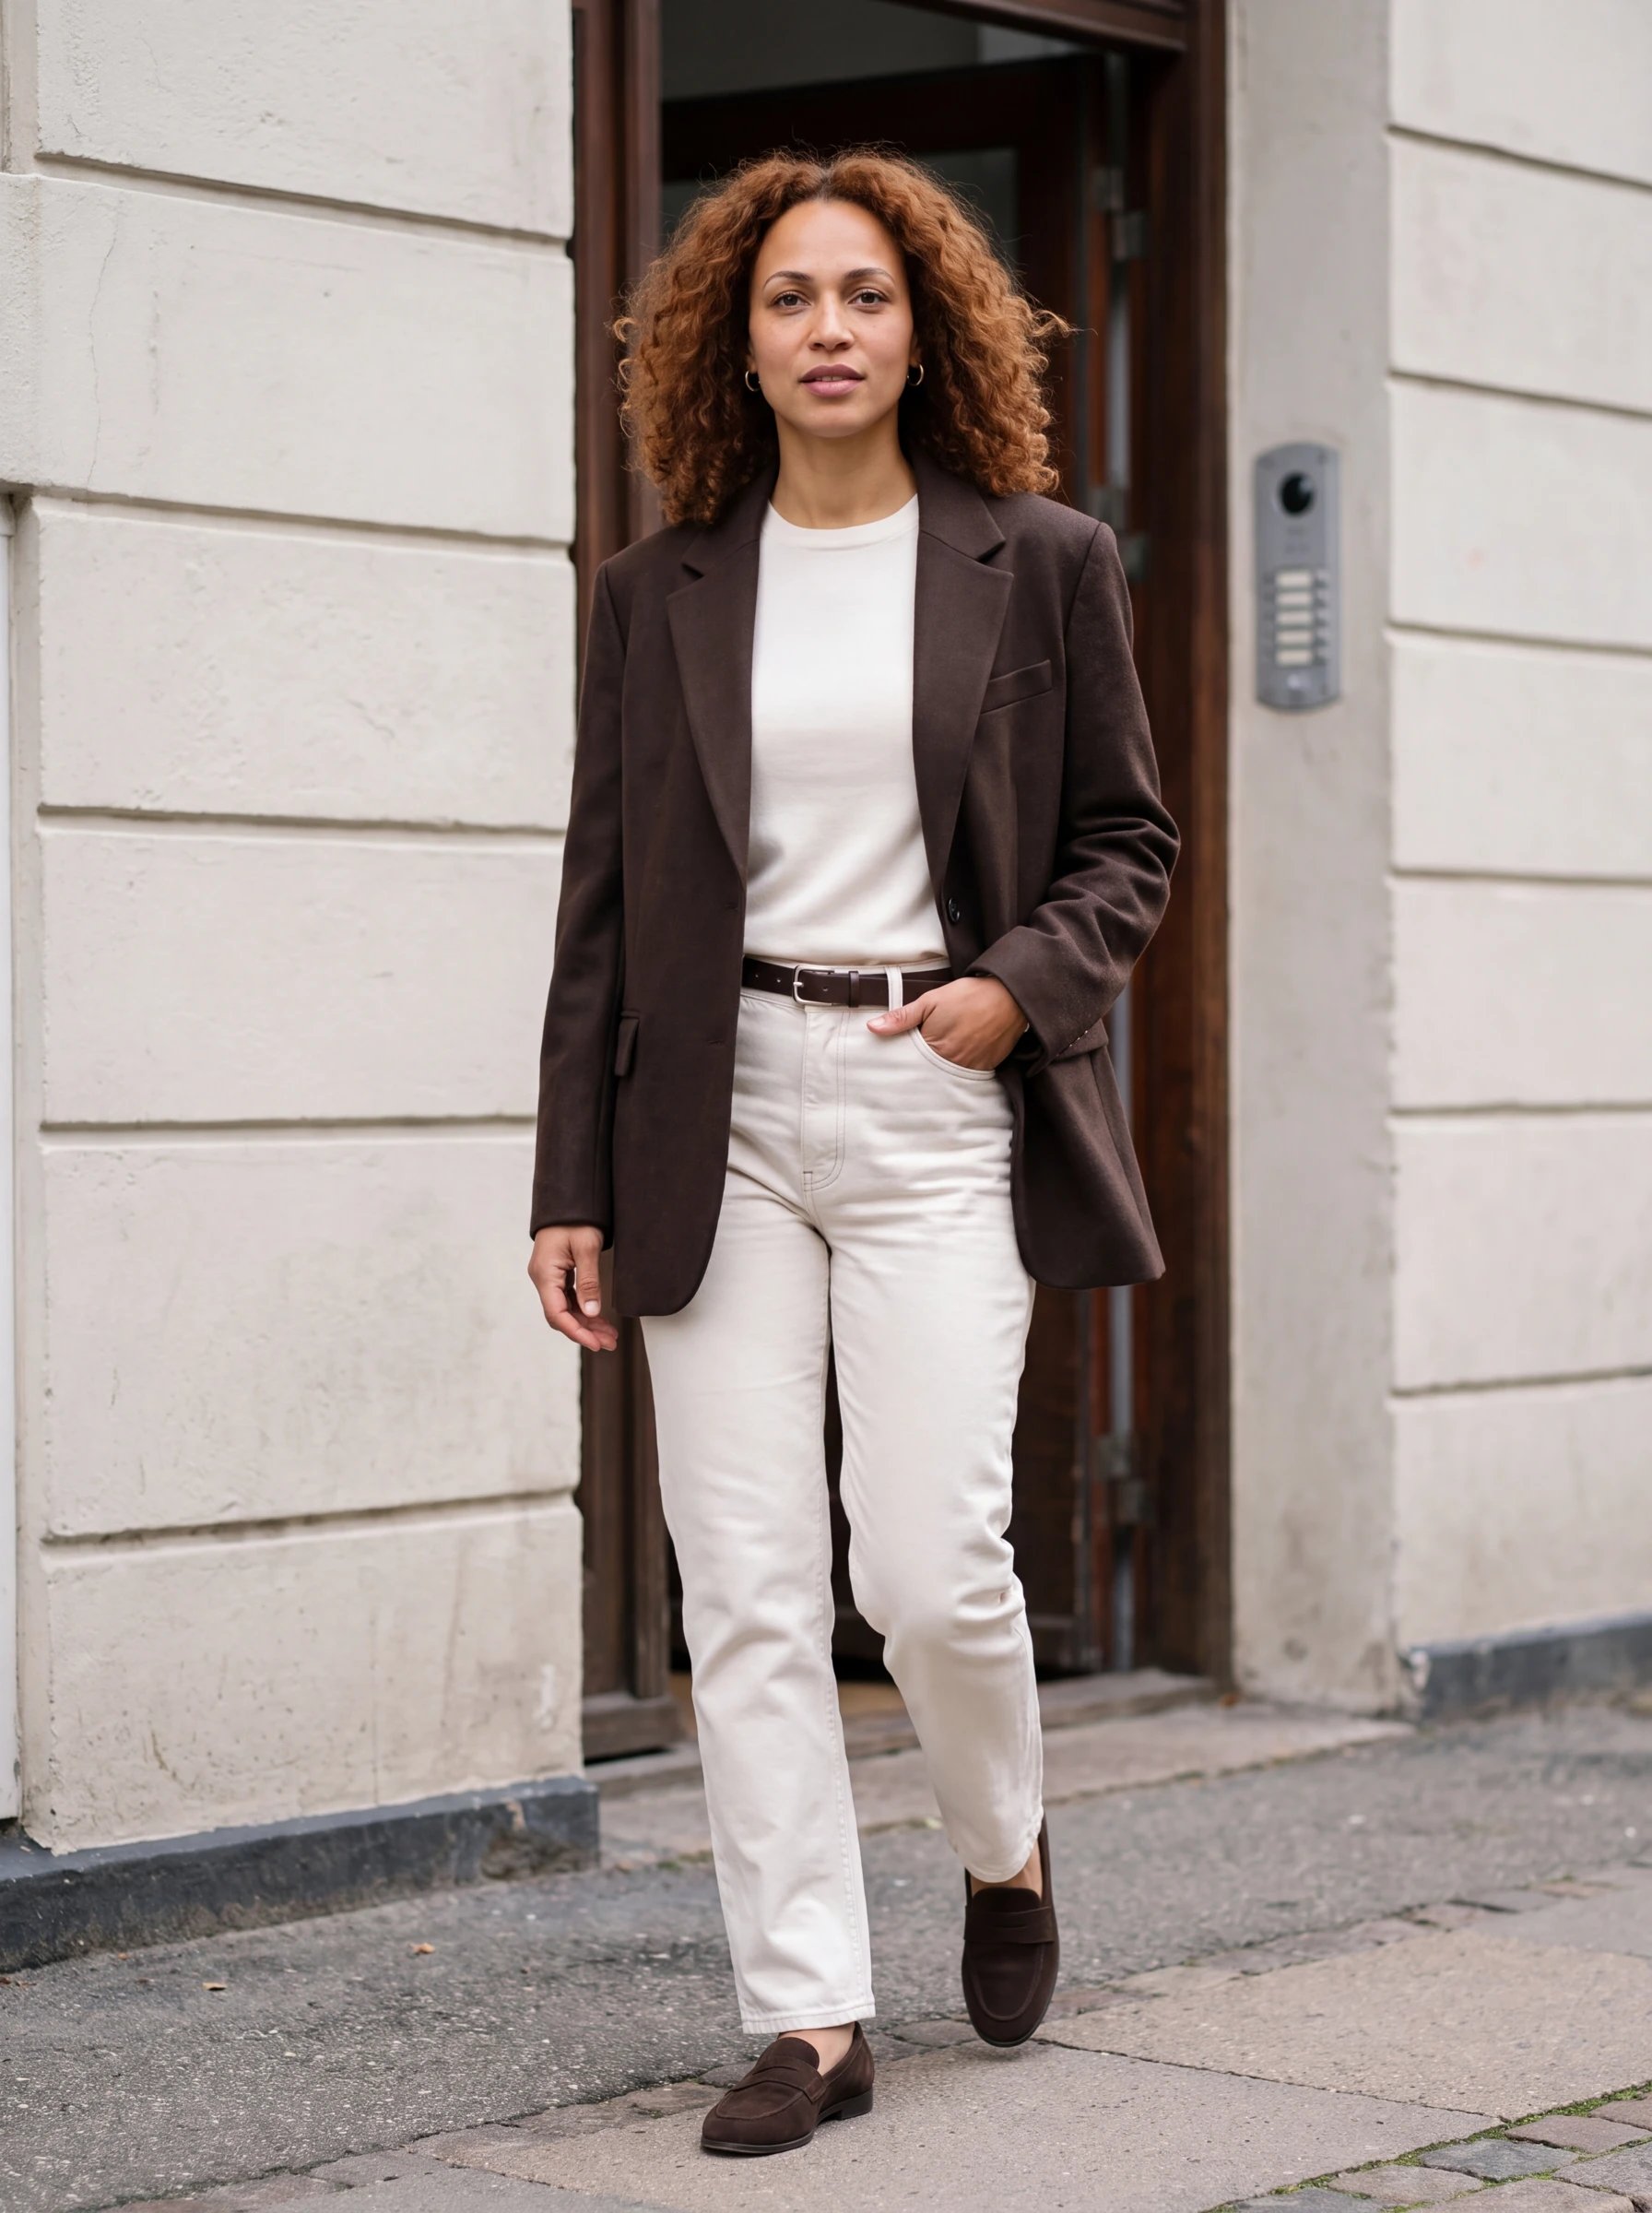
Avatar Builder turns a person description or your own photos into a saved avatar you can reuse in Generate. You review the person before using them across products and scenes.Meet Mara, the avatar we created for this walkthrough. Both photos below use the same saved avatar and a coordinated outfit description: a chocolate wool blazer, ivory knit, ecru denim, and brown loafers. We used Nano Banana Pro, 4K, with soft window light for one photo and an overcast street setting for the other.
Open Avatar Builder in the Studio sidebar. Choose a gender option and add the appearance you want under Attributes. Press Enter to add an attribute; you can also paste a comma-separated list.For Mara, we used:
30 years old, shoulder-length curly auburn hair, brown eyes,light freckles, warm medium skin tone, natural makeup
Describe stable features here. Choose the outfit, setting, and campaign pose later in Generate.Choose an image model and quality, then review the displayed credit cost. Our starter used Nano Banana Pro, 2K; the saved reference set below used Nano Banana 2, 2K.
Start with a small set of clear appearance details.
Starting from a real person? Add source photos instead. Use clear photos of the same person, with an unobstructed face and consistent appearance. You can add up to eight photos you have permission to use. With source photos, the builder can go directly to generating references.
2
Review the starter portrait
When starting from a description, choose Generate Starter. Check the face, hair, age, and overall appearance when it finishes.Use Regenerate if the person is not right yet. When the starter looks good, choose Generate References.
Approve the person before creating the reference set.
3
Check all four views
The builder creates a Neutral Headshot, 45-Degree Headshot, Full-Body Front, and Full-Body Angled Pose. Together, these give future generations face and body references from different views.Inspect every image. The face, hair, skin tone, and proportions should describe the same person. Headshots should be clean portraits; full-body views should include the feet without awkward crops or extra body parts.
The four completed references we saved for Mara.
If one view needs work, use Regenerate on that card. Changes to Characteristics apply to the next regeneration; they do not rewrite finished images. Wait until all four views are ready, then choose Continue to Save.
4
Save a recognizable name
Enter an Avatar Name, review the reference thumbnails and description, then choose Save Avatar. We named this one Mara.
Save the reviewed references as a reusable avatar.
5
Use the avatar in Generate
Open Generate, select the Avatar tile, and choose the saved avatar. Add your garment and a preset, then generate a first product photo.Keep the avatar selected for the next image. Change the product, pose direction, or preset according to the shot you need, and compare each result with the references.
Reuse the saved avatar instead of re-describing a similar person each time.
Keep faces clear and avoid conflicting person references in the same generation.
Check a neutral product photo before introducing dramatic lighting or strong profile views.
Review the set together. We optimise the workflows for high accuracy, but occasional mistakes can still happen.
The images in this guide were generated through bitStudio for this walkthrough. They are examples of a reviewed workflow, not a guarantee that every first attempt will look the same.Create a product photo → · Build a campaign →
{"docsConfig":{"theme":"mint","$schema":"https://mintlify.com/docs.json","name":"bitStudio","description":"Practical guides to fashion photos, virtual try-on, editing, and video, with the bitStudio API reference.","colors":{"primary":"#525252","light":"#D4D4D4","dark":"#737373"},"logo":{"light":"https://mintcdn.com/bitstudio-docs/JUz9tve18opy8JPn/logo/light.svg?fit=max\u0026auto=format\u0026n=JUz9tve18opy8JPn\u0026q=85\u0026s=492890d236f11eeaa9595fffd6717877","dark":"https://mintcdn.com/bitstudio-docs/JUz9tve18opy8JPn/logo/dark.svg?fit=max\u0026auto=format\u0026n=JUz9tve18opy8JPn\u0026q=85\u0026s=68f5ad9c21204ec54f6b21e507f827b1","href":"https://bitstudio.ai"},"favicon":"https://mintcdn.com/bitstudio-docs/JUz9tve18opy8JPn/favicon.png?fit=max\u0026auto=format\u0026n=JUz9tve18opy8JPn\u0026q=85\u0026s=f32b6b7bdf3eaa3065de0affd37fd813","api":{"openapi":"api-reference/openapi.json","playground":{"display":"simple"}},"navbar":{"links":[{"href":"mailto:[email protected]","label":"Support"}],"primary":{"type":"button","label":"Open Studio","href":"https://bitstudio.ai/studio"}},"footer":{"links":[{"header":"bitStudio","items":[{"label":"Studio","href":"https://bitstudio.ai/studio"},{"label":"Pricing","href":"https://bitstudio.ai/pricing"},{"label":"Contact support","href":"mailto:[email protected]"}]},{"header":"More","items":[{"label":"virtual.fit docs","href":"https://docs.virtual.fit"},{"label":"Privacy policy","href":"https://bitstudio.ai/privacy-policy"},{"label":"Terms of service","href":"https://bitstudio.ai/terms-of-service"}]}]},"seo":{"indexing":"navigable"},"contextual":{"options":["copy","view"],"display":"header"},"styling":{"latex":false},"navigation":{"pages":[]}},"deployment":{"deploymentMetadataValue":{"subdomain":"bitstudio-docs","hasAudioNarration":false,"actualSubdomain":"bitstudio-docs","customDomains":["docs.bitstudio.ai"],"gitSource":{"type":"github","owner":"bitstudio-ai","repo":"docs","deployBranch":"main","contentDirectory":"","isPrivate":true,"mountPath":"","label":""},"chroma":{"latestBuiltDeploymentHistoryId":"6aaaa1562c444bf4729cadec","collectionId":"d91b7af4-5935-4c1b-807d-cd2d934965ac","liveDeploymentHistoryId":"6aaaa1562c444bf4729cadec","schemaVersion":"v3"},"entitlements":{},"buildId":"6aaaa1562c444bf4729cadec","clientVersion":"0.0.3933","searchFilterCounts":[{"language":"default","tag":"API reference","count":49},{"language":"default","tag":"Guides","count":22},{"language":"default","tag":"More reference","count":20},{"language":"default","tag":"Legacy API","count":20},{"language":"default","tag":"Your creative tools","count":7},{"language":"default","tag":"What do you want to make?","count":6},{"language":"default","tag":"Results and integration","count":5},{"language":"default","tag":"Reusable assets","count":5},{"language":"default","tag":"Image tools","count":5},{"language":"default","tag":"Virtual try-on","count":5}]},"assistantConfig":{"enableAskAiButton":false,"enableStarterQuestions":false,"enableContextualStarterQuestions":false,"enableAskAiSearchBar":true},"hasChatPermissions":false,"hasWebMcpPermissions":false,"toggles":[{"name":"kill-isr","enabled":true,"variant":{"name":"disabled","enabled":false,"feature_enabled":true},"impressionData":false},{"name":"agent-mintlify-slack","enabled":true,"variant":{"name":"disabled","enabled":false,"feature_enabled":true},"impressionData":false},{"name":"editor-v7-file-tree","enabled":true,"variant":{"name":"disabled","enabled":false,"feature_enabled":true},"impressionData":false},{"name":"agent-integrations-settings","enabled":true,"variant":{"name":"disabled","enabled":false,"feature_enabled":true},"impressionData":false},{"name":"automations-pr-grouping","enabled":true,"variant":{"name":"disabled","enabled":false,"feature_enabled":true},"impressionData":false},{"name":"custom-prefix","enabled":true,"variant":{"name":"disabled","enabled":false,"feature_enabled":true},"impressionData":false},{"name":"analytics-v7","enabled":true,"variant":{"name":"disabled","enabled":false,"feature_enabled":true},"impressionData":false},{"name":"user-flows-analytics","enabled":true,"variant":{"name":"disabled","enabled":false,"feature_enabled":true},"impressionData":false},{"name":"no-publish-flow","enabled":true,"variant":{"name":"disabled","enabled":false,"feature_enabled":true},"impressionData":false},{"name":"workos-onboarding","enabled":true,"variant":{"name":"disabled","enabled":false,"feature_enabled":true},"impressionData":false},{"name":"llms-txt-v2","enabled":true,"variant":{"name":"disabled","enabled":false,"feature_enabled":true},"impressionData":false},{"name":"pause-universal-search-reconcile","enabled":true,"variant":{"name":"disabled","enabled":false,"feature_enabled":true},"impressionData":false},{"name":"snapshot-serving-live","enabled":true,"variant":{"name":"disabled","enabled":false,"feature_enabled":true},"impressionData":false},{"name":"stripTemperatureMiddleware","enabled":true,"variant":{"name":"disabled","enabled":false,"feature_enabled":true},"impressionData":false},{"name":"per-site-search-delta","enabled":true,"variant":{"name":"disabled","enabled":false,"feature_enabled":true},"impressionData":false},{"name":"support-platform-pylon-zendesk","enabled":true,"variant":{"name":"disabled","enabled":false,"feature_enabled":true},"impressionData":false},{"name":"snapshot-serving","enabled":true,"variant":{"name":"disabled","enabled":false,"feature_enabled":true},"impressionData":false},{"name":"instant-rollback","enabled":true,"variant":{"name":"disabled","enabled":false,"feature_enabled":true},"impressionData":false},{"name":"granular-notifications-server","enabled":true,"variant":{"name":"disabled","enabled":false,"feature_enabled":true},"impressionData":false},{"name":"granular-notifications","enabled":true,"variant":{"name":"disabled","enabled":false,"feature_enabled":true},"impressionData":false},{"name":"editor-private-page-search","enabled":true,"variant":{"name":"disabled","enabled":false,"feature_enabled":true},"impressionData":false},{"name":"automations-fable","enabled":true,"variant":{"name":"disabled","enabled":false,"feature_enabled":true},"impressionData":false},{"name":"fixed-ai-action-pricing","enabled":true,"variant":{"name":"disabled","enabled":false,"feature_enabled":true},"impressionData":false},{"name":"automation-resolve-merge-conflict","enabled":true,"variant":{"name":"disabled","enabled":false,"feature_enabled":true},"impressionData":false},{"name":"scoped-publishing","enabled":true,"variant":{"name":"disabled","enabled":false,"feature_enabled":true},"impressionData":false},{"name":"mintql","enabled":true,"variant":{"name":"disabled","enabled":false,"feature_enabled":true},"impressionData":false},{"name":"page-level-analytics","enabled":true,"variant":{"name":"disabled","enabled":false,"feature_enabled":true},"impressionData":false},{"name":"editor-version-history-v2","enabled":true,"variant":{"name":"disabled","enabled":false,"feature_enabled":true},"impressionData":false},{"name":"editor-nav-generations","enabled":true,"variant":{"name":"disabled","enabled":false,"feature_enabled":true},"impressionData":false},{"name":"billing-page-v2","enabled":true,"variant":{"name":"disabled","enabled":false,"feature_enabled":true},"impressionData":false},{"name":"vite-origin","enabled":true,"variant":{"name":"disabled","enabled":false,"feature_enabled":true},"impressionData":false},{"name":"workspace-projects","enabled":true,"variant":{"name":"disabled","enabled":false,"feature_enabled":true},"impressionData":false},{"name":"assistant-v5","enabled":true,"variant":{"name":"disabled","enabled":false,"feature_enabled":true},"impressionData":false},{"name":"byok-sep-25","enabled":true,"variant":{"name":"disabled","enabled":false,"feature_enabled":true},"impressionData":false},{"name":"fork-pr-previews","enabled":true,"variant":{"name":"disabled","enabled":false,"feature_enabled":true},"impressionData":false},{"name":"revalidation-jwt","enabled":true,"variant":{"name":"disabled","enabled":false,"feature_enabled":true},"impressionData":false},{"name":"editor-agent-model-picker","enabled":true,"variant":{"name":"disabled","enabled":false,"feature_enabled":true},"impressionData":false},{"name":"billing-updated-9-15","enabled":true,"variant":{"name":"disabled","enabled":false,"feature_enabled":true},"impressionData":false},{"name":"hobby-abuse-scan","enabled":true,"variant":{"name":"disabled","enabled":false,"feature_enabled":true},"impressionData":false},{"name":"dashboard-inbox","enabled":true,"variant":{"name":"disabled","enabled":false,"feature_enabled":true},"impressionData":false}],"isAtlas":false,"googleFontsInlined":false},"customCss":[{"filePath":"custom.css","content":"#api-playground-2-operation-page:has(#choose-your-inputs) .tabs:has([data-testid=\"tab-Uploaded person + garment images\"])>[data-component-part=tabs-list]{display:grid;grid-template-columns:repeat(2,minmax(0,1fr));grid-template-rows:repeat(3,auto);grid-auto-flow:column;gap:.5rem;overflow:visible;border:0}#api-playground-2-operation-page:has(#choose-your-inputs) .tabs:has([data-testid=\"tab-Uploaded person + garment images\"])>[data-component-part=tabs-list] [data-component-part=tab-button]{height:100%;max-width:none;margin:0;padding:.625rem .75rem;border:1px solid color-mix(in srgb,currentColor 20%,transparent);white-space:normal;line-height:1.4}#api-playground-2-operation-page:has(#choose-your-inputs) .tabs:has([data-testid=\"tab-Uploaded person + garment images\"])>[data-component-part=tabs-list] [data-active=true]{border-color:currentColor;background:color-mix(in srgb,currentColor 7%,transparent)}"}],"page":{"pagePath":"features/avatar-builder","slug":"/features/avatar-builder","pageMetadata":{"title":"Create your own avatar","sidebarTitle":"Avatar Builder","description":"Build a reusable person from a description or source photos, review four reference views, and use the avatar in a product series.","icon":"user-plus","keywords":["Avatar Builder","custom model","consistent person","reference photos"],"href":"/features/avatar-builder"},"description":{"compiledSource":"\"use strict\";\nconst {jsx: _jsx} = arguments[0];\nconst {useMDXComponents: _provideComponents} = arguments[0];\nfunction _createMdxContent(props) {\n const _components = {\n p: \"p\",\n ..._provideComponents(),\n ...props.components\n };\n return _jsx(_components.p, {\n children: \"Build a reusable person from a description or source photos, review four reference views, and use the avatar in a product series.\"\n });\n}\nfunction MDXContent(props = {}) {\n const {wrapper: MDXLayout} = {\n ..._provideComponents(),\n ...props.components\n };\n return MDXLayout ? _jsx(MDXLayout, {\n ...props,\n children: _jsx(_createMdxContent, {\n ...props\n })\n }) : _createMdxContent(props);\n}\nreturn {\n default: MDXContent\n};\n","frontmatter":{},"scope":{}},"pageType":"default","mdx":{"mdxSource":{"compiledSource":"\"use strict\";const{Fragment:_Fragment,jsx:_jsx,jsxs:_jsxs}=arguments[0];const{useMDXComponents:_provideComponents}=arguments[0];function _createMdxContent(props){const _components={a:`a`,code:`code`,li:`li`,p:`p`,pre:`pre`,span:`span`,strong:`strong`,ul:`ul`,..._provideComponents(),...props.components},{CodeBlock,Columns,Frame,Heading,OptimizedImage,Step,Steps}=_components;if(!CodeBlock)_missingMdxReference(`CodeBlock`,true);if(!Columns)_missingMdxReference(`Columns`,true);if(!Frame)_missingMdxReference(`Frame`,true);if(!Heading)_missingMdxReference(`Heading`,true);if(!OptimizedImage)_missingMdxReference(`OptimizedImage`,true);if(!Step)_missingMdxReference(`Step`,true);if(!Steps)_missingMdxReference(`Steps`,true);return _jsxs(_Fragment,{children:[_jsxs(_components.p,{children:[`Avatar Builder turns a person description or your own photos into a saved avatar you can reuse in `,_jsx(_components.strong,{children:`Generate`}),`. You review the person before using them across products and scenes.`]}),`\n`,_jsxs(_components.p,{children:[`Meet `,_jsx(_components.strong,{children:`Mara`}),`, the avatar we created for this walkthrough. Both photos below use the same saved avatar and a coordinated outfit description: a chocolate wool blazer, ivory knit, ecru denim, and brown loafers. We used `,_jsx(_components.strong,{children:`Nano Banana Pro, 4K`}),`, with soft window light for one photo and an overcast street setting for the other.`]}),`\n`,_jsxs(Columns,{cols:2,children:[_jsx(Frame,{caption:`Mara · Daylight studio`,children:_jsx(OptimizedImage,{src:`https://mintcdn.com/bitstudio-docs/JUz9tve18opy8JPn/images/examples/mara-daylight.webp?fit=max\u0026auto=format\u0026n=JUz9tve18opy8JPn\u0026q=85\u0026s=9a5d5ad872383182e19d8a8ac1f6f13f`,alt:`Mara wearing a chocolate wool blazer, ivory knit top, ecru jeans, and brown loafers beside a studio window`,\"data-og-width\":`1792`,width:`1792`,\"data-og-height\":`2400`,height:`2400`,\"data-path\":`images/examples/mara-daylight.webp`,\"data-optimize\":`true`,\"data-opv\":`3`,srcset:`https://mintcdn.com/bitstudio-docs/JUz9tve18opy8JPn/images/examples/mara-daylight.webp?w=280\u0026fit=max\u0026auto=format\u0026n=JUz9tve18opy8JPn\u0026q=85\u0026s=aa65cc6970cd08ccc856b1cde23c2037 280w, https://mintcdn.com/bitstudio-docs/JUz9tve18opy8JPn/images/examples/mara-daylight.webp?w=560\u0026fit=max\u0026auto=format\u0026n=JUz9tve18opy8JPn\u0026q=85\u0026s=817ed75751c5f6591d6a0bb251f10b56 560w, https://mintcdn.com/bitstudio-docs/JUz9tve18opy8JPn/images/examples/mara-daylight.webp?w=840\u0026fit=max\u0026auto=format\u0026n=JUz9tve18opy8JPn\u0026q=85\u0026s=957b08372ea5cf074ddf47c5198ce1cb 840w, https://mintcdn.com/bitstudio-docs/JUz9tve18opy8JPn/images/examples/mara-daylight.webp?w=1100\u0026fit=max\u0026auto=format\u0026n=JUz9tve18opy8JPn\u0026q=85\u0026s=ca8fdd79dc881b24c8349ed59ae7b102 1100w, https://mintcdn.com/bitstudio-docs/JUz9tve18opy8JPn/images/examples/mara-daylight.webp?w=1650\u0026fit=max\u0026auto=format\u0026n=JUz9tve18opy8JPn\u0026q=85\u0026s=758ec1f6c4bff65897ede2446aea3aee 1650w, https://mintcdn.com/bitstudio-docs/JUz9tve18opy8JPn/images/examples/mara-daylight.webp?w=2500\u0026fit=max\u0026auto=format\u0026n=JUz9tve18opy8JPn\u0026q=85\u0026s=2e9e0f801689bbbbbd2b7a446089a9f8 2500w`})}),_jsx(Frame,{caption:`Mara · Quiet street`,children:_jsx(OptimizedImage,{src:`https://mintcdn.com/bitstudio-docs/JUz9tve18opy8JPn/images/examples/mara-street.webp?fit=max\u0026auto=format\u0026n=JUz9tve18opy8JPn\u0026q=85\u0026s=0d3a9a748a2dd0df737c8fb26885d78d`,alt:`Mara in coordinated chocolate and ivory tailoring walking beside a pale stone facade`,\"data-og-width\":`1792`,width:`1792`,\"data-og-height\":`2400`,height:`2400`,\"data-path\":`images/examples/mara-street.webp`,\"data-optimize\":`true`,\"data-opv\":`3`,srcset:`https://mintcdn.com/bitstudio-docs/JUz9tve18opy8JPn/images/examples/mara-street.webp?w=280\u0026fit=max\u0026auto=format\u0026n=JUz9tve18opy8JPn\u0026q=85\u0026s=e115d7ea90b41ec04266e96751660ec7 280w, https://mintcdn.com/bitstudio-docs/JUz9tve18opy8JPn/images/examples/mara-street.webp?w=560\u0026fit=max\u0026auto=format\u0026n=JUz9tve18opy8JPn\u0026q=85\u0026s=94bc41e19beef861c51331c26d509a39 560w, https://mintcdn.com/bitstudio-docs/JUz9tve18opy8JPn/images/examples/mara-street.webp?w=840\u0026fit=max\u0026auto=format\u0026n=JUz9tve18opy8JPn\u0026q=85\u0026s=a604bc00d53fe395f931443079d13c5f 840w, https://mintcdn.com/bitstudio-docs/JUz9tve18opy8JPn/images/examples/mara-street.webp?w=1100\u0026fit=max\u0026auto=format\u0026n=JUz9tve18opy8JPn\u0026q=85\u0026s=e00364e261b2d1c8d75d0d20f645f4b6 1100w, https://mintcdn.com/bitstudio-docs/JUz9tve18opy8JPn/images/examples/mara-street.webp?w=1650\u0026fit=max\u0026auto=format\u0026n=JUz9tve18opy8JPn\u0026q=85\u0026s=d978445d2d58fcdc37ea48edc6dd2738 1650w, https://mintcdn.com/bitstudio-docs/JUz9tve18opy8JPn/images/examples/mara-street.webp?w=2500\u0026fit=max\u0026auto=format\u0026n=JUz9tve18opy8JPn\u0026q=85\u0026s=3a9556197ce1b312252e56053b6182bf 2500w`})})]}),`\n`,_jsx(Heading,{level:`2`,id:`build-the-avatar`,children:`Build the avatar`}),`\n`,_jsxs(Steps,{children:[_jsxs(Step,{title:`Define the person`,children:[_jsxs(_components.p,{children:[`Open `,_jsx(_components.strong,{children:`Avatar Builder`}),` in the Studio sidebar. Choose a gender option and add the appearance you want under `,_jsx(_components.strong,{children:`Attributes`}),`. Press Enter to add an attribute; you can also paste a comma-separated list.`]}),_jsx(_components.p,{children:`For Mara, we used:`}),_jsx(CodeBlock,{filename:``,numberOfLines:`3`,language:`text`,children:_jsx(_components.pre,{className:`shiki shiki-themes github-light-default dark-plus`,style:{backgroundColor:`#ffffff`,\"--shiki-dark-bg\":`#0B0C0E`,color:`#1f2328`,\"--shiki-dark\":`#D4D4D4`},language:`text`,children:_jsxs(_components.code,{language:`text`,numberOfLines:`3`,children:[_jsx(_components.span,{className:`line`,children:_jsx(_components.span,{children:`30 years old, shoulder-length curly auburn hair, brown eyes,`})}),`\n`,_jsx(_components.span,{className:`line`,children:_jsx(_components.span,{children:`light freckles, warm medium skin tone, natural makeup`})}),`\n`,_jsx(_components.span,{className:`line`,children:_jsx(_components.span,{})})]})})}),_jsx(_components.p,{children:`Describe stable features here. Choose the outfit, setting, and campaign pose later in Generate.`}),_jsxs(_components.p,{children:[`Choose an image model and quality, then review the displayed credit cost. Our starter used `,_jsx(_components.strong,{children:`Nano Banana Pro, 2K`}),`; the saved reference set below used `,_jsx(_components.strong,{children:`Nano Banana 2, 2K`}),`.`]}),_jsx(Frame,{caption:`Start with a small set of clear appearance details.`,children:_jsx(OptimizedImage,{src:`https://mintcdn.com/bitstudio-docs/JUz9tve18opy8JPn/images/studio/avatar-define.png?fit=max\u0026auto=format\u0026n=JUz9tve18opy8JPn\u0026q=85\u0026s=7914f7b90d936f0df3ee8c7bfd8fcc35`,alt:`Avatar Builder with Female selected, Mara’s appearance attributes, and Nano Banana Pro 2K selected`,\"data-og-width\":`1225`,width:`1225`,\"data-og-height\":`1000`,height:`1000`,\"data-path\":`images/studio/avatar-define.png`,\"data-optimize\":`true`,\"data-opv\":`3`,srcset:`https://mintcdn.com/bitstudio-docs/JUz9tve18opy8JPn/images/studio/avatar-define.png?w=280\u0026fit=max\u0026auto=format\u0026n=JUz9tve18opy8JPn\u0026q=85\u0026s=95d5cc11aad1f898dc5f022aba6728b2 280w, https://mintcdn.com/bitstudio-docs/JUz9tve18opy8JPn/images/studio/avatar-define.png?w=560\u0026fit=max\u0026auto=format\u0026n=JUz9tve18opy8JPn\u0026q=85\u0026s=6eed27eddafd70b9fb3d7768477baee5 560w, https://mintcdn.com/bitstudio-docs/JUz9tve18opy8JPn/images/studio/avatar-define.png?w=840\u0026fit=max\u0026auto=format\u0026n=JUz9tve18opy8JPn\u0026q=85\u0026s=87fcfd38af598c241417d0d6fa2d68b4 840w, https://mintcdn.com/bitstudio-docs/JUz9tve18opy8JPn/images/studio/avatar-define.png?w=1100\u0026fit=max\u0026auto=format\u0026n=JUz9tve18opy8JPn\u0026q=85\u0026s=bbd9d248855b5bd85b1135ba7f3601f5 1100w, https://mintcdn.com/bitstudio-docs/JUz9tve18opy8JPn/images/studio/avatar-define.png?w=1650\u0026fit=max\u0026auto=format\u0026n=JUz9tve18opy8JPn\u0026q=85\u0026s=19eca6e30036af25bb790247ab4ece80 1650w, https://mintcdn.com/bitstudio-docs/JUz9tve18opy8JPn/images/studio/avatar-define.png?w=2500\u0026fit=max\u0026auto=format\u0026n=JUz9tve18opy8JPn\u0026q=85\u0026s=57c30d41bb9124fca882e1dad28359a2 2500w`})}),_jsxs(_components.p,{children:[_jsx(_components.strong,{children:`Starting from a real person?`}),` Add source photos instead. Use clear photos of the same person, with an unobstructed face and consistent appearance. You can add up to eight photos you have permission to use. With source photos, the builder can go directly to generating references.`]})]}),_jsxs(Step,{title:`Review the starter portrait`,children:[_jsxs(_components.p,{children:[`When starting from a description, choose `,_jsx(_components.strong,{children:`Generate Starter`}),`. Check the face, hair, age, and overall appearance when it finishes.`]}),_jsxs(_components.p,{children:[`Use `,_jsx(_components.strong,{children:`Regenerate`}),` if the person is not right yet. When the starter looks good, choose `,_jsx(_components.strong,{children:`Generate References`}),`.`]}),_jsx(Frame,{caption:`Approve the person before creating the reference set.`,children:_jsx(OptimizedImage,{src:`https://mintcdn.com/bitstudio-docs/JUz9tve18opy8JPn/images/studio/avatar-starter.png?fit=max\u0026auto=format\u0026n=JUz9tve18opy8JPn\u0026q=85\u0026s=680c889e699c912698baed94dce64548`,alt:`Completed starter portrait of Mara with Regenerate and Generate References controls`,\"data-og-width\":`1225`,width:`1225`,\"data-og-height\":`1234`,height:`1234`,\"data-path\":`images/studio/avatar-starter.png`,\"data-optimize\":`true`,\"data-opv\":`3`,srcset:`https://mintcdn.com/bitstudio-docs/JUz9tve18opy8JPn/images/studio/avatar-starter.png?w=280\u0026fit=max\u0026auto=format\u0026n=JUz9tve18opy8JPn\u0026q=85\u0026s=56e76acbf52404ef7d3944f292e781bd 280w, https://mintcdn.com/bitstudio-docs/JUz9tve18opy8JPn/images/studio/avatar-starter.png?w=560\u0026fit=max\u0026auto=format\u0026n=JUz9tve18opy8JPn\u0026q=85\u0026s=3dd6315fb544e1302b94d38f26d2e85f 560w, https://mintcdn.com/bitstudio-docs/JUz9tve18opy8JPn/images/studio/avatar-starter.png?w=840\u0026fit=max\u0026auto=format\u0026n=JUz9tve18opy8JPn\u0026q=85\u0026s=db8f02399248d5189af739d0956d0a99 840w, https://mintcdn.com/bitstudio-docs/JUz9tve18opy8JPn/images/studio/avatar-starter.png?w=1100\u0026fit=max\u0026auto=format\u0026n=JUz9tve18opy8JPn\u0026q=85\u0026s=a742fd6a73e541e63d03589d3779e8d5 1100w, https://mintcdn.com/bitstudio-docs/JUz9tve18opy8JPn/images/studio/avatar-starter.png?w=1650\u0026fit=max\u0026auto=format\u0026n=JUz9tve18opy8JPn\u0026q=85\u0026s=eceaa422a8b52e05aceeb55f990009af 1650w, https://mintcdn.com/bitstudio-docs/JUz9tve18opy8JPn/images/studio/avatar-starter.png?w=2500\u0026fit=max\u0026auto=format\u0026n=JUz9tve18opy8JPn\u0026q=85\u0026s=060a73d198421afe0e52771bab0b0bf2 2500w`})})]}),_jsxs(Step,{title:`Check all four views`,children:[_jsxs(_components.p,{children:[`The builder creates a `,_jsx(_components.strong,{children:`Neutral Headshot`}),`, `,_jsx(_components.strong,{children:`45-Degree Headshot`}),`, `,_jsx(_components.strong,{children:`Full-Body Front`}),`, and `,_jsx(_components.strong,{children:`Full-Body Angled Pose`}),`. Together, these give future generations face and body references from different views.`]}),_jsx(_components.p,{children:`Inspect every image. The face, hair, skin tone, and proportions should describe the same person. Headshots should be clean portraits; full-body views should include the feet without awkward crops or extra body parts.`}),_jsx(Frame,{caption:`The four completed references we saved for Mara.`,children:_jsx(OptimizedImage,{src:`https://mintcdn.com/bitstudio-docs/JUz9tve18opy8JPn/images/studio/avatar-references.png?fit=max\u0026auto=format\u0026n=JUz9tve18opy8JPn\u0026q=85\u0026s=f35b0233e8d7e18c459611a42fa12f0c`,alt:`Four completed Mara reference cards: neutral headshot, angled headshot, full-body front, and full-body angled pose`,\"data-og-width\":`1225`,width:`1225`,\"data-og-height\":`1000`,height:`1000`,\"data-path\":`images/studio/avatar-references.png`,\"data-optimize\":`true`,\"data-opv\":`3`,srcset:`https://mintcdn.com/bitstudio-docs/JUz9tve18opy8JPn/images/studio/avatar-references.png?w=280\u0026fit=max\u0026auto=format\u0026n=JUz9tve18opy8JPn\u0026q=85\u0026s=030869155aad8bbb0a6feac30cbdb85e 280w, https://mintcdn.com/bitstudio-docs/JUz9tve18opy8JPn/images/studio/avatar-references.png?w=560\u0026fit=max\u0026auto=format\u0026n=JUz9tve18opy8JPn\u0026q=85\u0026s=6e6399e33ee2a50e23bc785a4d8e584a 560w, https://mintcdn.com/bitstudio-docs/JUz9tve18opy8JPn/images/studio/avatar-references.png?w=840\u0026fit=max\u0026auto=format\u0026n=JUz9tve18opy8JPn\u0026q=85\u0026s=845db1e3c173b122efbfc3044f1236a9 840w, https://mintcdn.com/bitstudio-docs/JUz9tve18opy8JPn/images/studio/avatar-references.png?w=1100\u0026fit=max\u0026auto=format\u0026n=JUz9tve18opy8JPn\u0026q=85\u0026s=565aaa549f720cd1e043d1d2cbabe682 1100w, https://mintcdn.com/bitstudio-docs/JUz9tve18opy8JPn/images/studio/avatar-references.png?w=1650\u0026fit=max\u0026auto=format\u0026n=JUz9tve18opy8JPn\u0026q=85\u0026s=55fdae625a418c0e614c409f8732eac7 1650w, https://mintcdn.com/bitstudio-docs/JUz9tve18opy8JPn/images/studio/avatar-references.png?w=2500\u0026fit=max\u0026auto=format\u0026n=JUz9tve18opy8JPn\u0026q=85\u0026s=9e9745006d840ed1f83bd3fe0e60117e 2500w`})}),_jsxs(_components.p,{children:[`If one view needs work, use `,_jsx(_components.strong,{children:`Regenerate`}),` on that card. Changes to `,_jsx(_components.strong,{children:`Characteristics`}),` apply to the next regeneration; they do not rewrite finished images. Wait until all four views are ready, then choose `,_jsx(_components.strong,{children:`Continue to Save`}),`.`]})]}),_jsxs(Step,{title:`Save a recognizable name`,children:[_jsxs(_components.p,{children:[`Enter an `,_jsx(_components.strong,{children:`Avatar Name`}),`, review the reference thumbnails and description, then choose `,_jsx(_components.strong,{children:`Save Avatar`}),`. We named this one `,_jsx(_components.strong,{children:`Mara`}),`.`]}),_jsx(Frame,{caption:`Save the reviewed references as a reusable avatar.`,children:_jsx(OptimizedImage,{src:`https://mintcdn.com/bitstudio-docs/JUz9tve18opy8JPn/images/studio/avatar-save.png?fit=max\u0026auto=format\u0026n=JUz9tve18opy8JPn\u0026q=85\u0026s=a737c5a30d2dbfe5446af19c9708414b`,alt:`Save Avatar screen with the name Mara and four generated reference thumbnails`,\"data-og-width\":`1225`,width:`1225`,\"data-og-height\":`1000`,height:`1000`,\"data-path\":`images/studio/avatar-save.png`,\"data-optimize\":`true`,\"data-opv\":`3`,srcset:`https://mintcdn.com/bitstudio-docs/JUz9tve18opy8JPn/images/studio/avatar-save.png?w=280\u0026fit=max\u0026auto=format\u0026n=JUz9tve18opy8JPn\u0026q=85\u0026s=9bdb129e3afd55c3a51670063991f4f1 280w, https://mintcdn.com/bitstudio-docs/JUz9tve18opy8JPn/images/studio/avatar-save.png?w=560\u0026fit=max\u0026auto=format\u0026n=JUz9tve18opy8JPn\u0026q=85\u0026s=e093a828a6c1fd3d9632fabf74e5874f 560w, https://mintcdn.com/bitstudio-docs/JUz9tve18opy8JPn/images/studio/avatar-save.png?w=840\u0026fit=max\u0026auto=format\u0026n=JUz9tve18opy8JPn\u0026q=85\u0026s=e57633b48d39517e2e46fc73d46a8047 840w, https://mintcdn.com/bitstudio-docs/JUz9tve18opy8JPn/images/studio/avatar-save.png?w=1100\u0026fit=max\u0026auto=format\u0026n=JUz9tve18opy8JPn\u0026q=85\u0026s=057ce7e39ec162a24d0171d2698f52fd 1100w, https://mintcdn.com/bitstudio-docs/JUz9tve18opy8JPn/images/studio/avatar-save.png?w=1650\u0026fit=max\u0026auto=format\u0026n=JUz9tve18opy8JPn\u0026q=85\u0026s=cc71d5010e7ca4deb3341750d4e33cb8 1650w, https://mintcdn.com/bitstudio-docs/JUz9tve18opy8JPn/images/studio/avatar-save.png?w=2500\u0026fit=max\u0026auto=format\u0026n=JUz9tve18opy8JPn\u0026q=85\u0026s=ef7dadd73ac1ee630bf30959d3baa81a 2500w`})})]}),_jsxs(Step,{title:`Use the avatar in Generate`,children:[_jsxs(_components.p,{children:[`Open `,_jsx(_components.strong,{children:`Generate`}),`, select the `,_jsx(_components.strong,{children:`Avatar`}),` tile, and choose the saved avatar. Add your garment and a preset, then generate a first product photo.`]}),_jsx(_components.p,{children:`Keep the avatar selected for the next image. Change the product, pose direction, or preset according to the shot you need, and compare each result with the references.`})]})]}),`\n`,_jsx(Heading,{level:`2`,id:`make-the-identity-easier-to-keep`,children:`Make the identity easier to keep`}),`\n`,_jsxs(_components.ul,{children:[`\n`,_jsx(_components.li,{children:`Reuse the saved avatar instead of re-describing a similar person each time.`}),`\n`,_jsx(_components.li,{children:`Keep faces clear and avoid conflicting person references in the same generation.`}),`\n`,_jsx(_components.li,{children:`Check a neutral product photo before introducing dramatic lighting or strong profile views.`}),`\n`,_jsx(_components.li,{children:`Review the set together. We optimise the workflows for high accuracy, but occasional mistakes can still happen.`}),`\n`]}),`\n`,_jsx(_components.p,{children:`The images in this guide were generated through bitStudio for this walkthrough. They are examples of a reviewed workflow, not a guarantee that every first attempt will look the same.`}),`\n`,_jsxs(_components.p,{children:[_jsx(_components.a,{href:`/guides/product-photos`,children:`Create a product photo →`}),` · `,_jsx(_components.a,{href:`/guides/campaigns`,children:`Build a campaign →`})]})]})}function MDXContent(props={}){const{wrapper:MDXLayout}={..._provideComponents(),...props.components};return MDXLayout?_jsx(MDXLayout,{...props,children:_jsx(_createMdxContent,{...props})}):_createMdxContent(props)}return{default:MDXContent};function _missingMdxReference(id,component){throw new Error(`Expected `+(component?`component`:`object`)+\" `\"+id+\"` to be defined: you likely forgot to import, pass, or provide it.\")}","frontmatter":{},"scope":{"config":{},"pageMetadata":{"title":"Create your own avatar","sidebarTitle":"Avatar Builder","description":"Build a reusable person from a description or source photos, review four reference views, and use the avatar in a product series.","icon":"user-plus","keywords":["Avatar Builder","custom model","consistent person","reference photos"],"href":"/features/avatar-builder"}}},"mdxSourceWithNoJs":null},"mdxExtracts":{"tableOfContents":[{"title":"Build the avatar","slug":"build-the-avatar","depth":2,"children":[]},{"title":"Make the identity easier to keep","slug":"make-the-identity-easier-to-keep","depth":2,"children":[]}],"codeExamples":{}},"jsLinks":[],"subdomain":"bitstudio-docs","siteName":"bitStudio","title":"Create your own avatar - bitStudio","navMaps":{"firstHrefInVersion":{},"firstHrefInLanguage":{}},"lastModified":"2026-09-06T14:30:19.658Z","originalFileLocation":"features/avatar-builder.mdx"},"headHtml":"\u003cscript data-mint-head>(function(){var d=document.documentElement,p=null;if(!p){try{p=localStorage.getItem(\"isDarkMode\")}catch(e){}if(p==='true')p='dark';else if(p==='false')p='light';if(p!=='light'\u0026\u0026p!=='dark'\u0026\u0026p!=='system')p=\"system\"}var r=p==='system'?(matchMedia(\"(prefers-color-scheme: dark)\").matches?'dark':'light'):p;d.classList.remove(r==='dark'?'light':'dark');d.classList.add(r);d.setAttribute(\"data-theme-preference\",p)})();\u003c/script>\u003cmeta data-mint-head name=\"description\" content=\"Build a reusable person from a description or source photos, review four reference views, and use the avatar in a product series.\">\u003cmeta data-mint-head name=\"application-name\" content=\"bitStudio\">\u003cmeta data-mint-head name=\"generator\" content=\"Mintlify\">\u003clink data-mint-head rel=\"icon\" type=\"image/png\" sizes=\"192x192\" href=\"/mintlify-assets/_mintlify/favicons/bitstudio-docs/tvjYdQHndO2KwlSn/_generated/favicon/android-chrome-192x192.png\" media=\"(prefers-color-scheme: light)\">\u003clink data-mint-head rel=\"apple-touch-icon\" type=\"image/png\" sizes=\"180x180\" href=\"/mintlify-assets/_mintlify/favicons/bitstudio-docs/tvjYdQHndO2KwlSn/_generated/favicon/apple-touch-icon.png\">\u003clink data-mint-head rel=\"icon\" type=\"image/png\" sizes=\"16x16\" href=\"/mintlify-assets/_mintlify/favicons/bitstudio-docs/tvjYdQHndO2KwlSn/_generated/favicon/favicon-16x16.png\" media=\"(prefers-color-scheme: light)\">\u003clink data-mint-head rel=\"icon\" type=\"image/png\" sizes=\"32x32\" href=\"/mintlify-assets/_mintlify/favicons/bitstudio-docs/tvjYdQHndO2KwlSn/_generated/favicon/favicon-32x32.png\" media=\"(prefers-color-scheme: light)\">\u003clink data-mint-head rel=\"shortcut icon\" type=\"image/x-icon\" href=\"/mintlify-assets/_mintlify/favicons/bitstudio-docs/tvjYdQHndO2KwlSn/_generated/favicon/favicon.ico\" media=\"(prefers-color-scheme: light)\">\u003clink data-mint-head rel=\"icon\" type=\"image/png\" sizes=\"192x192\" href=\"/mintlify-assets/_mintlify/favicons/bitstudio-docs/tvjYdQHndO2KwlSn/_generated/favicon-dark/android-chrome-192x192.png\" media=\"(prefers-color-scheme: dark)\">\u003clink data-mint-head rel=\"icon\" type=\"image/png\" sizes=\"16x16\" href=\"/mintlify-assets/_mintlify/favicons/bitstudio-docs/tvjYdQHndO2KwlSn/_generated/favicon-dark/favicon-16x16.png\" media=\"(prefers-color-scheme: dark)\">\u003clink data-mint-head rel=\"icon\" type=\"image/png\" sizes=\"32x32\" href=\"/mintlify-assets/_mintlify/favicons/bitstudio-docs/tvjYdQHndO2KwlSn/_generated/favicon-dark/favicon-32x32.png\" media=\"(prefers-color-scheme: dark)\">\u003clink data-mint-head rel=\"shortcut icon\" type=\"image/x-icon\" href=\"/mintlify-assets/_mintlify/favicons/bitstudio-docs/tvjYdQHndO2KwlSn/_generated/favicon-dark/favicon.ico\" media=\"(prefers-color-scheme: dark)\">\u003cmeta data-mint-head property=\"og:title\" content=\"Create your own avatar - bitStudio\">\u003cmeta data-mint-head property=\"og:description\" content=\"Build a reusable person from a description or source photos, review four reference views, and use the avatar in a product series.\">\u003cmeta data-mint-head property=\"og:site_name\" content=\"bitStudio\">\u003cmeta data-mint-head property=\"og:url\" content=\"https://docs.bitstudio.ai/features/avatar-builder\">\u003cmeta data-mint-head property=\"og:type\" content=\"website\">\u003cmeta data-mint-head property=\"og:image\" content=\"https://bitstudio-docs.mintlify.app/_mintlify/api/og/v2?division=Your+creative+tools\u0026amp;title=Create+your+own+avatar\u0026amp;description=Build+a+reusable+person+from+a+description+or+source+photos%2C+review+four+reference+views%2C+and+use+the+avatar+in+a+product+series.\u0026amp;theme=1c917d6e81fbcae65b711c83\u0026amp;signature=01faaccad7e08756e8fe1f2a0aa0edd14ddf6ff43c82e8fa477b0dc94bfdc442\">\u003cmeta data-mint-head property=\"og:image:width\" content=\"1200\">\u003cmeta data-mint-head property=\"og:image:height\" content=\"630\">\u003cmeta data-mint-head name=\"twitter:card\" content=\"summary_large_image\">\u003cmeta data-mint-head name=\"twitter:title\" content=\"Create your own avatar - bitStudio\">\u003cmeta data-mint-head name=\"twitter:description\" content=\"Build a reusable person from a description or source photos, review four reference views, and use the avatar in a product series.\">\u003cmeta data-mint-head name=\"twitter:image\" content=\"https://bitstudio-docs.mintlify.app/_mintlify/api/og/v2?division=Your+creative+tools\u0026amp;title=Create+your+own+avatar\u0026amp;description=Build+a+reusable+person+from+a+description+or+source+photos%2C+review+four+reference+views%2C+and+use+the+avatar+in+a+product+series.\u0026amp;theme=1c917d6e81fbcae65b711c83\u0026amp;signature=01faaccad7e08756e8fe1f2a0aa0edd14ddf6ff43c82e8fa477b0dc94bfdc442\">\u003cmeta data-mint-head name=\"twitter:image:width\" content=\"1200\">\u003cmeta data-mint-head name=\"twitter:image:height\" content=\"630\">\u003cmeta data-mint-head name=\"msapplication-config\" content=\"/mintlify-assets/_mintlify/favicons/bitstudio-docs/tvjYdQHndO2KwlSn/_generated/favicon/browserconfig.xml\">\u003cmeta data-mint-head name=\"apple-mobile-web-app-title\" content=\"bitStudio\">\u003cmeta data-mint-head name=\"msapplication-TileColor\" content=\"#525252\">\u003clink data-mint-head rel=\"canonical\" href=\"https://docs.bitstudio.ai/features/avatar-builder\">\u003clink data-mint-head rel=\"alternate\" type=\"application/xml\" href=\"/sitemap.xml\">\u003clink data-mint-head rel=\"alternate\" type=\"text/markdown\" href=\"/features/avatar-builder.md\">\u003cscript data-mint-head type=\"application/ld+json\">{\"@context\":\"https://schema.org\",\"@graph\":[{\"@type\":\"Organization\",\"@id\":\"https://docs.bitstudio.ai/#organization\",\"name\":\"bitStudio\",\"url\":\"https://docs.bitstudio.ai\",\"logo\":{\"@type\":\"ImageObject\",\"url\":\"https://mintcdn.com/bitstudio-docs/JUz9tve18opy8JPn/logo/light.svg?fit=max\u0026auto=format\u0026n=JUz9tve18opy8JPn\u0026q=85\u0026s=492890d236f11eeaa9595fffd6717877\"}},{\"@type\":\"WebSite\",\"@id\":\"https://docs.bitstudio.ai#website\",\"name\":\"bitStudio\",\"url\":\"https://docs.bitstudio.ai\",\"publisher\":{\"@id\":\"https://docs.bitstudio.ai/#organization\"}},{\"@type\":\"WebPage\",\"@id\":\"https://docs.bitstudio.ai/features/avatar-builder#webpage\",\"url\":\"https://docs.bitstudio.ai/features/avatar-builder\",\"name\":\"Create your own avatar\",\"description\":\"Build a reusable person from a description or source photos, review four reference views, and use the avatar in a product series.\",\"dateModified\":\"2026-09-06T14:30:19.658Z\",\"isPartOf\":{\"@id\":\"https://docs.bitstudio.ai#website\"},\"breadcrumb\":{\"@id\":\"https://docs.bitstudio.ai/features/avatar-builder#breadcrumb\"}},{\"@type\":\"BreadcrumbList\",\"@id\":\"https://docs.bitstudio.ai/features/avatar-builder#breadcrumb\",\"itemListElement\":[{\"@type\":\"ListItem\",\"position\":1,\"name\":\"bitStudio\",\"item\":\"https://docs.bitstudio.ai\"},{\"@type\":\"ListItem\",\"position\":2,\"name\":\"Create your own avatar\",\"item\":\"https://docs.bitstudio.ai/features/avatar-builder\"}]},{\"@type\":[\"Article\",\"TechArticle\"],\"@id\":\"https://docs.bitstudio.ai/features/avatar-builder#article\",\"headline\":\"Create your own avatar\",\"name\":\"Create your own avatar\",\"description\":\"Build a reusable person from a description or source photos, review four reference views, and use the avatar in a product series.\",\"url\":\"https://docs.bitstudio.ai/features/avatar-builder\",\"mainEntityOfPage\":{\"@id\":\"https://docs.bitstudio.ai/features/avatar-builder#webpage\"},\"dateModified\":\"2026-09-06T14:30:19.658Z\",\"keywords\":\"Avatar Builder, custom model, consistent person, reference photos\",\"publisher\":{\"@id\":\"https://docs.bitstudio.ai/#organization\"},\"isPartOf\":{\"@id\":\"https://docs.bitstudio.ai#website\"}}]}\u003c/script>\u003cscript data-mint-head type=\"application/ld+json\">{\"@context\":\"https://schema.org\",\"@type\":\"WebSite\",\"name\":\"bitStudio\",\"creator\":{\"@type\":\"Organization\",\"name\":\"Mintlify\",\"url\":\"https://mintlify.com\"}}\u003c/script>","siteName":"bitStudio","nav":{"global":null,"tabs":[{"tab":"Guides","groups":[{"group":"Start here","pages":[{"title":"Make your next image","sidebarTitle":"Welcome to bitStudio","icon":"sparkles","href":""},{"title":"Your first product photo","icon":"play","href":"/quickstart"},{"title":"Find your way around Studio","icon":"compass","href":"/getting-started/studio-tour"}]},{"group":"What do you want to make?","pages":[{"title":"Put your product on a model","icon":"shirt","href":"/guides/product-photos"},{"title":"Try an outfit on a person","icon":"person","href":"/guides/virtual-try-on"},{"title":"Use the same model again","icon":"users","href":"/guides/consistent-models"},{"title":"Build a consistent campaign","icon":"images","href":"/guides/campaigns"},{"title":"Make flat lays and packshots","icon":"box","href":"/guides/flat-lays-and-packshots"},{"title":"Turn a photo into a video","description":"Animate an approved fashion image with a clear motion brief, then review the whole clip.","icon":"film","href":"/guides/video"}]},{"group":"Your creative tools","pages":[{"title":"Create your own avatar","sidebarTitle":"Avatar Builder","icon":"user-plus","href":"/features/avatar-builder"},{"title":"Choose and reuse a preset","description":"Use a preset to direct the setting, composition, lighting, and overall look of a photo.","icon":"wand-magic-sparkles","href":"/features/presets"},{"title":"Save and reuse your products","icon":"shirt","href":"/features/wardrobe"},{"title":"Edit part of a photo","icon":"paintbrush","href":"/features/editor"},{"title":"Guide the pose with a reference","icon":"person","href":"/features/pose-and-face"},{"title":"Change the crop or increase detail","icon":"expand","href":"/features/extend-and-upscale"},{"title":"Find, review, and download your work","icon":"images","href":"/features/library-and-downloads"}]},{"group":"Get better results","pages":[{"title":"Choose better source photos","icon":"camera","href":"/tips/source-photos"},{"title":"Write directions that are easy to follow","icon":"pen","href":"/tips/prompting"},{"title":"Choose a model and quality","icon":"sliders","href":"/tips/models-and-quality"}]},{"group":"Your account and help","pages":[{"title":"Manage credits and your plan","icon":"credit-card","href":"/account/credits-and-plans"},{"title":"Work in the right workspace","icon":"users","href":"/account/workspaces"},{"title":"Fix a problem and keep working","icon":"circle-question","href":"/help/troubleshooting"}]}]},{"tab":"API reference","pages":[{"title":"API reference","href":"/api-reference/introduction"}]}]},"title":"Create your own avatar - bitStudio","buildId":"dpl_GnxaU9nEer7XK27kw3dpfPrs9geh","deploymentId":"dpl_GnxaU9nEer7XK27kw3dpfPrs9geh","dynamics":["07c022d89b","a74be98ba7"],"chunks":["Frame-C1EX3v38.js","DynamicMarkdown-BPGty-u8.js","zoom-image-lightbox-Cv5hibpS.js","PlusIcon-owOTCErD.js","lightbox-handle-r17bVUz3.js"]}